Publishing a 1C:Enterprise infobase
Available only with a subscription.
Overview
The tuna 1c command publishes a 1C:Enterprise infobase and makes it reachable from the internet: through the web client
in a browser or the 1C thin client. You do not need to install and configure a web server, forward ports or get a public IP.
1C has no HTTP server of its own: the web client and the thin client over HTTP are served by the web server
extension module, which is loaded into Apache or IIS. tuna 1c does all of that for you:
- finds the installed 1C platform and its web server extension module;
- on the first run downloads Apache httpd from
releases.tuna.aminto the cache (%LocalAppData%\tuna); - starts it on
127.0.0.1and publishes the infobase in it; - opens an HTTP tunnel to that web server.
The infobase is available at <tunnel address>/1c/, and the root of the address redirects there.
Requirements
- A tuna subscription. On the free plan the command does not start: the server replies
1C unavailable for free plan. - Windows x64. The command exists only in the tuna build for Windows x64. The 1C platform itself can be either 32-bit or 64-bit. The Linux, macOS and Windows ARM64 builds do not have this command.
- The "Web server extension modules" component in the 1C installation. Without it tuna reports that the module was not found. How to install it.
- A 1C license that allows connections through a web server. The training edition does not work.
On the first run tuna also installs Microsoft Visual C++ Redistributable if it is missing: Apache does not start without it. Windows may ask for confirmation (UAC).
Installing the web server extension modules
The component is part of the platform distribution but may be unselected by default. To add it to an existing 1C installation:
-
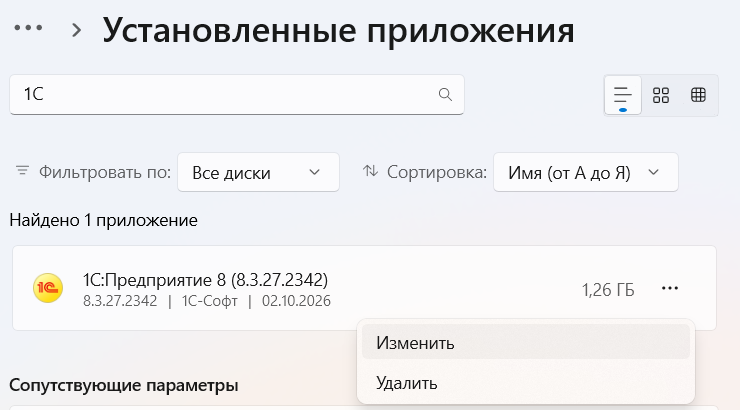
Open "Settings" → "Apps" → "Installed apps", find "1C:Enterprise 8" and choose "Modify" in the "…" menu. On Windows 10 and older the same is done through "Control Panel" → "Programs and Features".
-
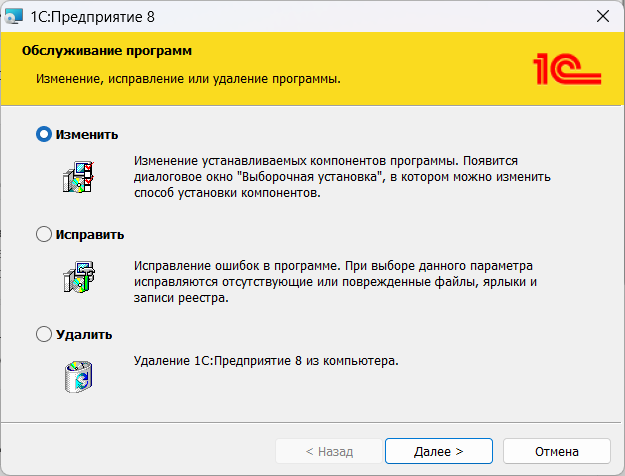
In the installer choose the "Modify" mode and click "Next".
-
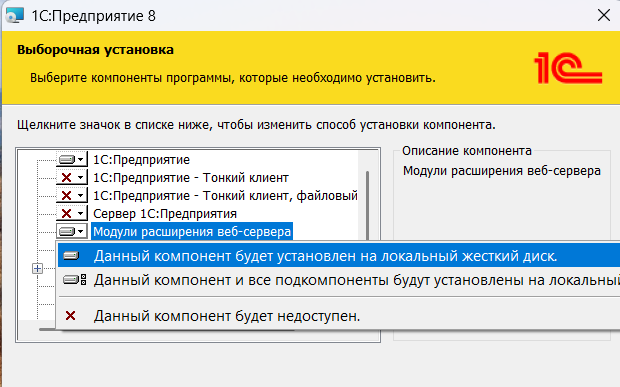
In the component list click the icon next to "Web server extension modules" and choose "This feature will be installed on local hard drive".
-
Click "Next" and wait for the installation to finish.
The screenshots show the Russian version of Windows and the 1C installer.
You can check the result with tuna 1c discover: the path to wsap24.dll appears next to the installation.
Quick start
Pick the 1C installation and the infobase in the wizard once:
tuna 1c setup
The wizard asks for the 1C installation, the infobase, the local port and where to save the settings. A step with a single option is skipped.
Publish the infobase and protect it with a password right away:
tuna 1c --basic-auth="login:password"
The header of the terminal interface shows:
| Line | What it contains |
|---|---|
Forwarding | Public address of the tunnel |
Local | Local address of the publication, it opens the infobase from the same computer |
1C client | A ready /WS"…" parameter for starting the thin client |
Platform | Directory and bitness of the 1C platform in use |
Warning | Warnings: the infobase is published without protection, the training edition is used |
Open the address from the Forwarding line in a browser or connect the thin client.
If the wizard did not find 1C or the infobase, see Diagnostics.
Examples
You can view all current flags, hints, and examples by calling help:
tuna 1c --help
Almost all flags have corresponding environment variables.
Which infobase to publish
There are three ways to specify the infobase:
tuna 1c "My infobase"
tuna 1c "C:\Bases\MyBase"
tuna 1c "Srvr=localhost;Ref=MyBase"
- The infobase name from the 1C launcher list — the one you see in the 1C start window.
- The directory of a file infobase.
- A connection string of a client/server infobase.
Without an argument tuna takes the infobase from the saved settings. If there are none and the launcher list has a single infobase, tuna publishes it; if there are several, it asks you to choose.
Publishing client/server infobases (Srvr=…;Ref=…) is supported, but we have not yet verified it on a production 1C cluster.
If you run into a problem, contact us.
Saved settings
tuna 1c setup writes your choice to the 1c section of the configuration file — the global tuna.yml
or .tuna.yml in the current directory:
1c:
  home: 'C:\Program Files (x86)\1cv8'
  platform: 'x86'
  name: 'My infobase'
  infobase: 'File="C:\Bases\MyBase";'
  port: 8314
The argument and command line flags take precedence over the settings from the file, and .tuna.yml in the current directory overrides the global tuna.yml.
To change the settings, run the wizard again or edit the file by hand.
1C installed in a non-standard directory
tuna looks for the platform in C:\Program Files\1cv8 and C:\Program Files (x86)\1cv8. If 1C is installed
elsewhere or you need to pick one of several installations, pass the directory and the bitness:
tuna 1c "C:\Bases\MyBase" --1c-home="D:\1cv8" --1c-platform=x86
Local port
By default the web server takes a random free port on 127.0.0.1. To pin the port:
tuna 1c "C:\Bases\MyBase" --1c-port=8314
Permanent address
The tunnel address is set the same way as for an HTTP tunnel: with a subdomain or your own domain.
With a permanent address users do not have to change the link and the /WS parameter after a restart.
tuna 1c "My infobase" --subdomain=my-1c
tuna 1c "My infobase" --domain=1c.example.com
Specifying a token
You can specify a particular token using the --token flag or the TUNA_TOKEN environment variable. Overriding follows the configuration ordering policy.
tuna 1c "My infobase" --token=tt_***
Specifying a connection region
You can specify a particular region using the --location/-l flag or the TUNA_LOCATION environment variable. Overriding follows the configuration ordering policy.
tuna 1c "My infobase" --location=ru
Connecting clients
Web client
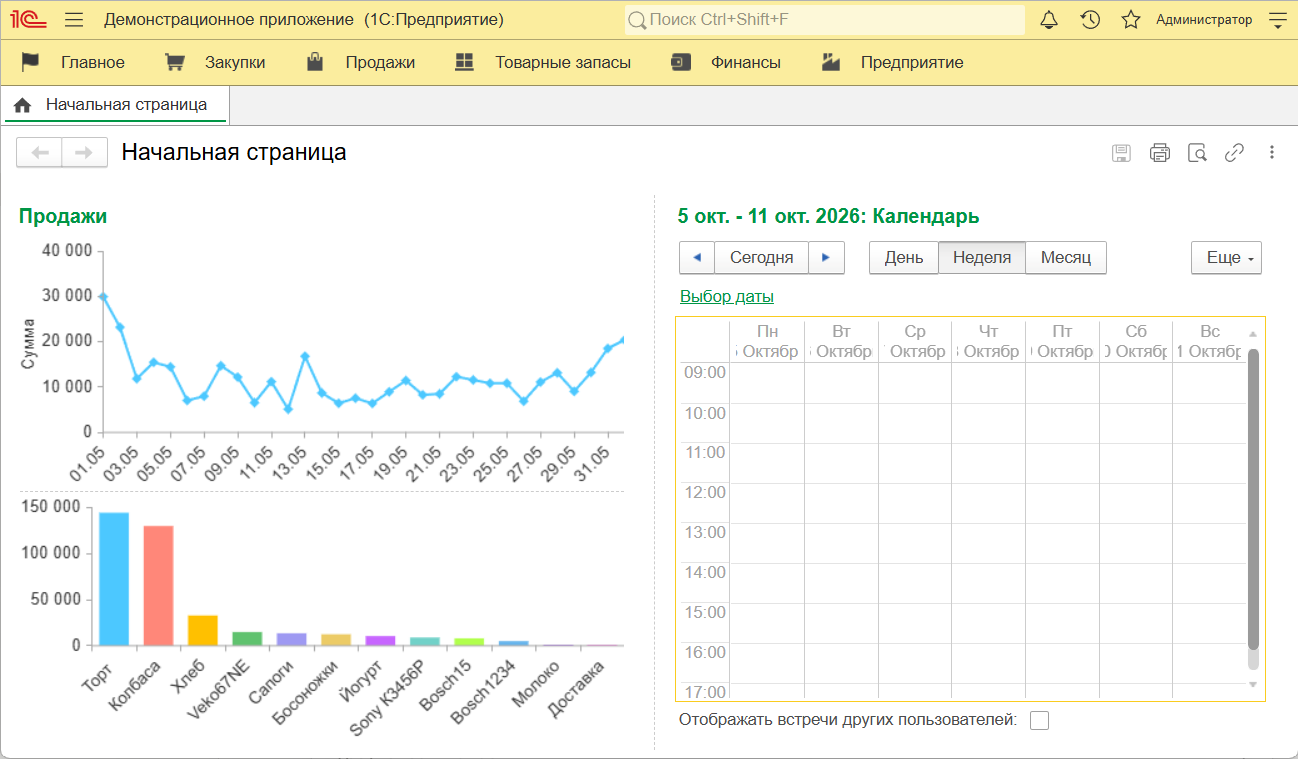
Open the tunnel address in a browser, tuna redirects to /1c/:
https://<tunnel address>/1c/
Thin client
Copy the parameter from the 1C client line in the header and start the thin client:
1cv8c.exe ENTERPRISE /WS"https://<tunnel address>/1c"
The same address can be added to the launcher list as an existing infobase located on a web server.
Security
tuna 1c opens the infobase to the whole internet: anyone can guess or find the tunnel address.
Only the 1C login window stands between a stranger and your data.
If you run the command without --basic-auth and --key-auth, tuna shows a warning. What you should do:
-
Protect the publication with a password — tuna asks for it before the request reaches 1C:
tuna 1c "My infobase" --basic-auth="login:password" -
Set strong passwords for all infobase users. A user without a password or with a weak one is an open door to the infobase. Check accounts with administrator rights first.
-
Restrict access by IP if the users' addresses are known:
tuna 1c "My infobase" --cidr-allow="203.0.113.0/24"
The other access protection options of the HTTP tunnel work too:
--key-auth, --cidr-deny, --rate-limit. Requests to the infobase are visible in the inspector,
you can turn it off with --inspect=false.
1C licenses
tuna publishes the infobase but does not change the 1C licensing rules: how many users can work through the web server at the same time is defined by your license.
The training edition does not work
The training edition of the platform (the 1cv8t directory) allows a single connection to the infobase, and the publication
itself takes it. You cannot log in with either the web client or the thin client. tuna warns about it in the header and in the tuna 1c discover output.
Developer license
You do not have to buy a 1C license to try it: the free developer license issued at developer.1c.ru is enough. That is what we tested the command with. It is a 1C license and does not replace a tuna subscription. See the 1C website for the terms and limits of the license. In our test one web client worked at a time: until the tab with the infobase is closed or the session times out, you cannot log in from another browser.
Publication files
For each infobase tuna creates a publication directory in %LocalAppData%\tuna\1c\. It contains:
| File | Purpose |
|---|---|
default.vrd | 1C publication descriptor |
httpd.conf | Apache configuration, regenerated on every start |
access.log, error.log | Web server logs |
tuna does not overwrite an existing default.vrd, so you can edit it by hand — for example, to enable
OData or HTTP services. To restore the original file:
tuna 1c "My infobase" --reset-vrd
Set your own publication directory with the --1c-publish-dir flag:
tuna 1c "My infobase" --1c-publish-dir="C:\tuna-1c\my-base"
Diagnostics
The tuna 1c discover command shows what tuna found on the computer: 1C installations, the path to the web server
extension module in each of them and the infobases from the launcher list.
tuna 1c discover
| What the output says | What to do |
|---|---|
An installation is marked web server extension module is not installed | Install the component |
The module is marked training edition, single connection | This is the training edition, you cannot log in to the infobase through it |
| No installations | Pass the directory with the --1c-home flag |
| No infobases | Pass the infobase directory or connection string as the argument |
If the infobase is published but does not open, check error.log in the publication directory.
Flag reference
| Flag | Environment variable | Description |
|---|---|---|
--1c-home | TUNA_1C_HOME | 1C:Enterprise installation directory |
--1c-platform | TUNA_1C_PLATFORM | Platform bitness: x64 or x86 |
--1c-port | TUNA_1C_PORT | Local port of the web server, a random free port by default |
--1c-publish-dir | TUNA_1C_PUBLISH_DIR | Directory with the publication files |
--reset-vrd | Regenerate default.vrd even if it exists | |
--basic-auth | TUNA_BASIC_AUTH | Login and password for access to the publication |
--key-auth | TUNA_KEY_AUTH | Key in the X-Token header |
--cidr-allow, --cidr-deny | TUNA_CIDR_ALLOW, TUNA_CIDR_DENY | Access by IP subnet |
--rate-limit | TUNA_RATE_LIMIT | Request rate limit |
--subdomain, -s | TUNA_SUBDOMAIN | Subdomain |
--domain, -d | TUNA_DOMAIN | Custom domain |
--location, -l | TUNA_LOCATION | Connection region |
--inspect | TUNA_INSPECT | Enable or disable the request inspector |
--qr | TUNA_QR_CODE | Show a QR code with the address |
--token | TUNA_TOKEN | Token |
Limitations
The command is new. We tested it on Windows 11 with the 32-bit 1C 8.3.27 platform and a file infobase: logging in with the web client
and the thin client through the public address, starting by infobase name and without arguments after tuna 1c setup, --1c-port,
--basic-auth in a browser. Not verified yet:
- the thin client together with
--basic-auth; - the 64-bit 1C platform and 1C 8.5;
- client/server infobases on a production 1C cluster;
- infobase directories with Cyrillic characters and spaces in the path;
- reports and print forms in the web client;
- running as a service.
If any of this does not work for you, contact us and we will help.