Connecting Your Own Domain
In this article, we will explain in detail how to connect your own domain to the Tuna platform and publish a local website to the internet without a public IP, complex network configurations like VPN, and without deploying code to any server or hosting.
Publishing on your own domain can be interesting for Demo stands when you present a solution to a client. The client sees a finished solution while you haven't spent a minute on environment preparation, and you can also fix small things on the fly. However, there can be many more use cases.
Connecting a Domain
Purchasing a Domain
First, you'll need your own domain (if you don't have one). You can buy it, for example, from Reg.ru or namecheap or any other domain registrar. For examples in this article, we use the domain tuna-dev.ru.
Connecting to Tuna and Getting Settings
Go to the domain management page in your personal account and click Add domain in the top right corner.

Select the Own domain type and enter your domain in the Domain field. In our case, it's api.tuna-dev.ru. If you have a Unicode domain, for example in one of these zones .РФ, .ДЕТИ, .ҚАЗ, you need to specify the converted punycode variant.

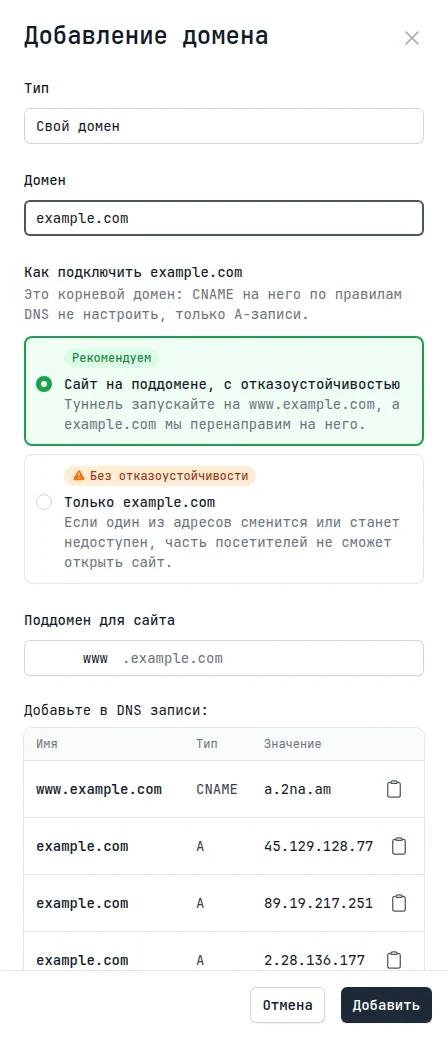
After specifying your domain, you will see the required DNS settings.
You can also add a custom domain from the CLI: tuna domain reserve api.tuna-dev.ru prints the DNS record and the tunnel command. In a terminal, tuna domain opens the domain table, where the n key does the same.
DNS Configuration
Go to the DNS records management panel and create the record shown in the dashboard. For a subdomain like api.tuna-dev.ru, this is a CNAME: it points to the Tuna infrastructure as a whole rather than to a specific server, so the domain works with fault tolerance. An apex domain like tuna-dev.ru can't be connected with a CNAME; there is a separate option for it. If you have an AAAA record specified for the selected domain, it needs to be deleted, as IPv6 is not currently supported.

Waiting for Confirmation
After creating the DNS record, you can return to your personal account and click Add. The domain will enter verification mode.

Validation usually takes from 15 minutes to 2 hours but can extend to a couple of days, depending on the DNS record TTL. The verification process is limited to 24 hours and is divided into 2 main stages:
- DNS Check - we verify that your domain is configured correctly
- TLS Check - we issue a Let's Encrypt certificate for your domain
If the addition process failed with a DNS error, check that you created the DNS record correctly and that it points to the right server. If everything is correct, the DNS cache may not have updated yet: wait and restart the check — with the button in the domain card or with tuna domain revalidate api.tuna-dev.ru. If the process failed with a TLS error, check the DNS configuration for obvious errors: AAAA records, recursively looped pointers. If you can't figure it out yourself, contact support.
The status log in the domain card and tuna domain get api.tuna-dev.ru show why a domain is stuck:
| Reason | What it means | What to do |
|---|---|---|
delegation_broken | The NS servers set at your registrar for the zone don't respond or aren't authoritative for it | Check the NS records at your registrar: they must match the servers where you created the DNS record |
cert_issue_failed | Let's Encrypt didn't issue the certificate; the status log shows the ACME error | Fix the cause from the error and restart the check |
dns_failed | A verified domain no longer points to Tuna | See below |
Usage
After successful domain verification, you will receive a notification email.

Now you can start using it. To do this, add the --domain flag or its short variant -d or an environment variable and your domain to the tuna http <your_port> command, for example:
tuna http 8080 --domain=api.tuna-dev.ru
tuna http 8080 -d api.tuna-dev.ru
export TUNA_DOMAIN=api.tuna-dev.ru
tuna http 8080
If the domain stops working
Tuna rechecks the DNS of verified domains once a day. If three checks in a row show that the domain no longer points to Tuna — for example, the record was deleted or the NS servers changed — the domain moves to the dns_failed status: the owner gets an email, and the domain's certificate is no longer served. Restore the DNS record and restart the check in the domain card or with:
tuna domain revalidate api.tuna-dev.ru
Apex Domain
An apex domain is the domain itself without a subdomain: example.com, not www.example.com. DNS rules don't allow a CNAME on it, only A records pointing to specific addresses. Such a domain works, but without fault tolerance: if one of the addresses changes or becomes unavailable, some visitors won't be able to open the site.
That's why, when you add an apex domain, the dashboard asks you to choose how to connect it.
Site on a Subdomain, with Fault Tolerance
This is the option we recommend. The tunnel runs on a subdomain: www.example.com by default, but you can choose your own, for example shop.example.com. The subdomain is connected with a CNAME, the apex with A records. Once both domains pass the DNS check, Tuna creates a gateway with a permanent redirect (code 308) from example.com to the subdomain. The page path is kept: example.com/catalog opens www.example.com/catalog.
After you add the domain, the dashboard shows the DNS records for both domains and the command to start a tunnel on the subdomain:
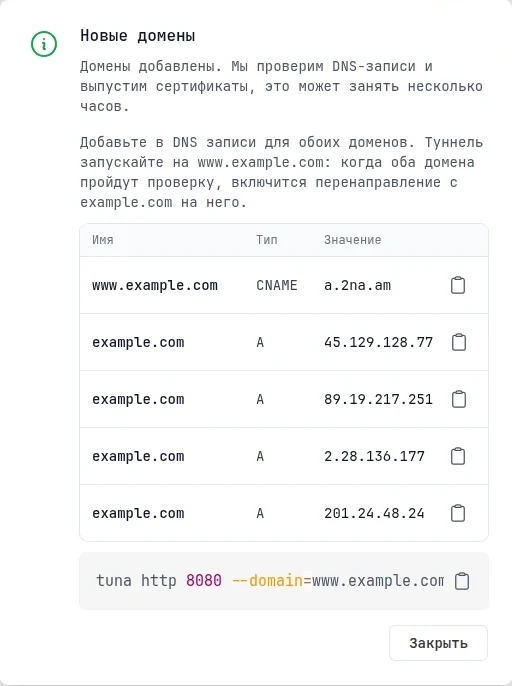
tuna http 8080 --domain=www.example.com
Once both domains pass the check, the apex in the list gets a redirect mark:

The redirect runs on a regular Tuna gateway. The gateway is named after the apex domain and is listed in the Gateways section. Its policy has a single rule: a redirect action with code 308 that carries the request path over to the subdomain:
---
rules:
  - actions:
      - type: redirect
        config:
          statusCode: 308
          from: ^(.*)$
          to: https://www.example.com${1}
You can edit the policy as with any other gateway — for example, to add rules that run before the redirect.
From the CLI, you can add the pair with one command — it prints the DNS records and the tunnel command:
tuna domain reserve example.com --redirect-to=www.example.com
The pair of domains takes two slots in your custom domain limit. If only one slot is free, the subdomain option is unavailable, and a link to upgrade your subscription appears next to it.
What to know about the redirect:
- The query string isn't kept on redirect:
example.com/catalog?utm_source=mailopenswww.example.com/catalog. Point links with UTM tags straight to the subdomain. - If you delete the redirect gateway, the redirect turns off, and the apex domain card gets a button to turn it back on.
- While the gateway runs on the apex, a tunnel on
example.comwon't start: the server responds withDomain already reserved by gateway. - If you delete the subdomain, the apex gateway stays and keeps redirecting to the deleted address. Delete it manually in the Gateways section.
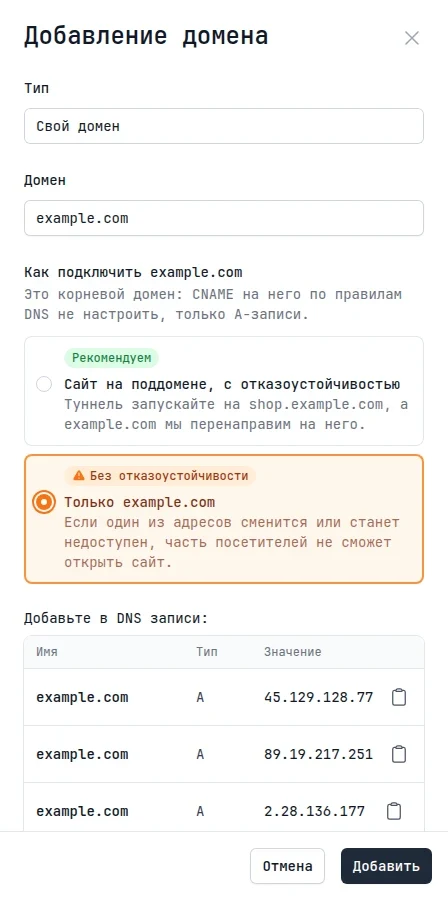
Apex Domain Only
The apex is connected with A records to every address of the cell, and the tunnel runs on example.com. Such a domain has no fault tolerance, and the dashboard warns you about it.
How to Migrate an Already Connected Domain
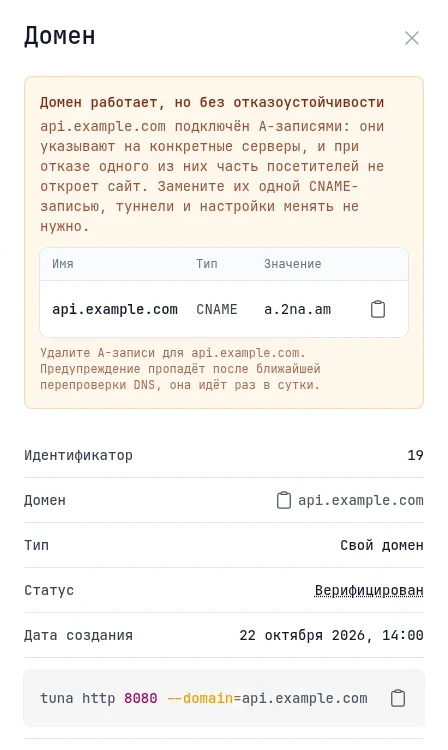
Apex domains connected earlier and subdomains on A records are marked with a warning icon in the list.

For an apex domain, the card has a step-by-step migration:
- Add a subdomain for the site. The dashboard shows the CNAME record to create at your registrar.
- Start the tunnel on the subdomain instead of the apex. Stop the tunnel on the apex: while it runs, the redirect won't turn on.
- Turn on the redirect to the subdomain. The button becomes available once the subdomain passes the DNS check. The redirect starts working in about a minute.
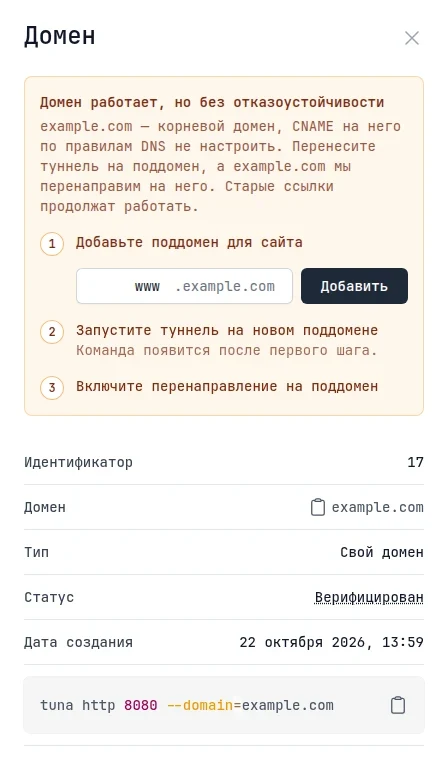
You can also do the third step from the CLI: tuna domain redirect example.com www.example.com.
Old links keep working: visitors coming to example.com land on the same pages of the subdomain.
If a subdomain is connected with A records, you don't need to change the tunnel or settings. Replace the A records with a single CNAME record from the domain card. The warning disappears after the next DNS recheck, which runs once a day.