Monitoring NanoKVM availability
NanoKVM is a compact IP-KVM device from Sipeed based on RISC-V (Cube/PCIe), ARM64 (Pro) or ARMv7 (GxxKVM/JxxKVM).
For embedded devices like NanoKVM, tracking their health is critical. Heartbeat monitoring lets you receive notifications if the device loses internet connectivity or stops responding.
This guide explains how to set up NanoKVM availability monitoring. If you also need remote access to the device over the internet, see the tunnel setup guide.
Preparation
What you need
- NanoKVM connected to the local network and reachable over SSH or via the terminal in the web UI
- An account at tuna.am
Installing tuna on NanoKVM (optional)
Heartbeat notifications can also be sent with curl — installing the tuna CLI is not mandatory, but if you also use tunnels for remote access, it makes sense to use the same client for Heartbeat notifications too.
Connect to NanoKVM over SSH:
ssh root@<NanoKVM-IP-address>
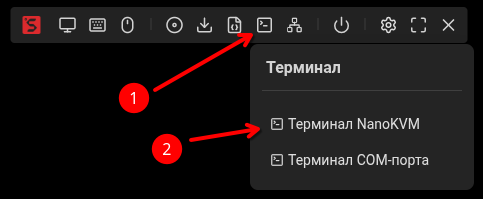
Or open the terminal in the web UI:
Install tuna with the script, specifying /data/tuna as the install directory:
- curl
- wget
mkdir -p /data/tuna
INSTALL_DIR=/data/tuna sh -c "$(curl -sSLf https://releases.tuna.am/tuna/get.sh)"
mkdir -p /data/tuna
INSTALL_DIR=/data/tuna sh -c "$(wget -qO- https://releases.tuna.am/tuna/get.sh)"
The /data partition is mounted as exFAT with fmask=0022, files automatically get 0755 permissions — the binary can be run right after copying. In addition, /data is preserved across updates, so tuna won't need to be reinstalled.
Creating a Heartbeat monitor
- Go to the dashboard → Monitors
- Click "Create monitor"
- Choose the Heartbeat type
- Set the parameters:
- Description: NanoKVM availability
- Interval: 5 minutes (the minimum on the free plan is 30 minutes)
- Grace Period: 1 minute (delay before the alert fires)
- Configure notification channels
- Save the monitor and copy the MONITOR_ID
More on Heartbeat monitors: Heartbeat documentation
Creating a monitoring script
Create the script /data/tuna/tuna-heartbeat.sh:
cat << 'EOF' > /data/tuna/tuna-heartbeat.sh
#!/bin/sh

# Wait for the network
while ! ip route | grep -q default; do
    sleep 1
done

# Infinite heartbeat loop
while true; do
    /data/tuna/tuna monitor ping --host=nanokvm YOUR_MONITOR_ID
    # Interval between pings (30 minutes = 1800 seconds)
    sleep 1800
done
EOF
chmod +x /data/tuna/tuna-heartbeat.sh
If you use curl, then instead of the line:
/data/tuna/tuna monitor ping --host=nanokvm YOUR_MONITOR_ID
put a curl call with the URL from the dashboard:
curl -sSLf -m 5 https://monitor.tuna.am/YOUR_MONITOR_ID/nanokvm
Replace YOUR_MONITOR_ID with the real monitor ID from your dashboard.
Parameter explanation:
| Parameter | Description |
|---|---|
YOUR_MONITOR_ID | Monitor ID from the dashboard (required) |
--host=nanokvm | Device identifier in monitoring logs (optional) |
sleep 300 | Interval between signals in seconds (must match the monitor's setting) |
Setting up autostart
Add a line to /etc/inittab for automatic startup and restart of monitoring:
cat << 'EOF' >> /etc/inittab

# Tuna Heartbeat monitor (respawn = auto-restart)
thb::respawn:/data/tuna/tuna-heartbeat.sh
EOF
Apply without reboot:
kill -HUP 1
Verifying it works
Make sure the monitoring process is running:
ps -ef | grep heartbeat
The output should contain a line with /data/tuna/tuna-heartbeat.sh. If the process is missing — check /etc/inittab:
grep heartbeat /etc/inittab
The line must start with thb::respawn, not #.
Check the monitor's status in the dashboard — within 1-2 minutes the status should change from "New" to "Up".
Managing monitoring
Stop monitoring:
sed -i 's/^thb:/#thb:/' /etc/inittab && kill -HUP 1
Start monitoring:
sed -i 's/^#thb:/thb:/' /etc/inittab && kill -HUP 1
Recovery after a reflash
The binary and scripts in /data/tuna/ are preserved when the application is updated through the web UI and during remote rsync. After a full reflash (Etcher) you will need to copy the binary again and recreate the scripts.
For remote rsync you only need to restore the lines in /etc/inittab:
cat << 'EOF' >> /etc/inittab

# Tuna Heartbeat monitor (respawn = auto-restart)
thb::respawn:/data/tuna/tuna-heartbeat.sh
EOF
kill -HUP 1
Why not cron?
NanoKVM has a known cron issue:
- Crontabs do not exist by default
- Crontabs that you create do not survive a reboot
- There is no system-wide
/etc/crontab
That's why for periodic tasks on NanoKVM it is recommended to use inittab with an infinite loop — this approach is reliable and matches the architecture of the system.
On regular Linux systems (Debian, Ubuntu) it is preferable to use cron or systemd timers for heartbeat monitoring. See examples in the Heartbeat documentation.
Troubleshooting
The heartbeat process does not start
Check that the process is in the list:
ps -ef | grep heartbeat
If the output has no lines with /data/tuna/tuna-heartbeat.sh — make sure the entry in /etc/inittab is not commented out:
grep heartbeat /etc/inittab
The line must start with thb::respawn, not #. If it is commented out — uncomment it and reload the configuration:
kill -HUP 1
The monitor shows "Down"
Reasons:
- Wrong MONITOR_ID
- No internet connection
- The interval in the script does not match the monitor's settings
Checks:
# Check that an IP address is assigned
ip addr

# Check the default route
ip route

# Check internet access
ping -c 3 8.8.8.8
After a firmware update heartbeat stopped working
Check whether the firmware was updated — after remote rsync you need to restore the entries in /etc/inittab (see Recovery after a reflash)