tuna ❤️ JetKVM
JetKVM is a compact IP-KVM device based on the Rockchip RV1106 (ARM Cortex-A7). It allows you to remotely control a computer: see the screen, control the keyboard and mouse, mount disk images — all through a web interface in the browser.
By default, JetKVM is only accessible on the local network. With Tuna, you can expose it to the internet — without a public IP, without a VPN, and without port forwarding on the router.
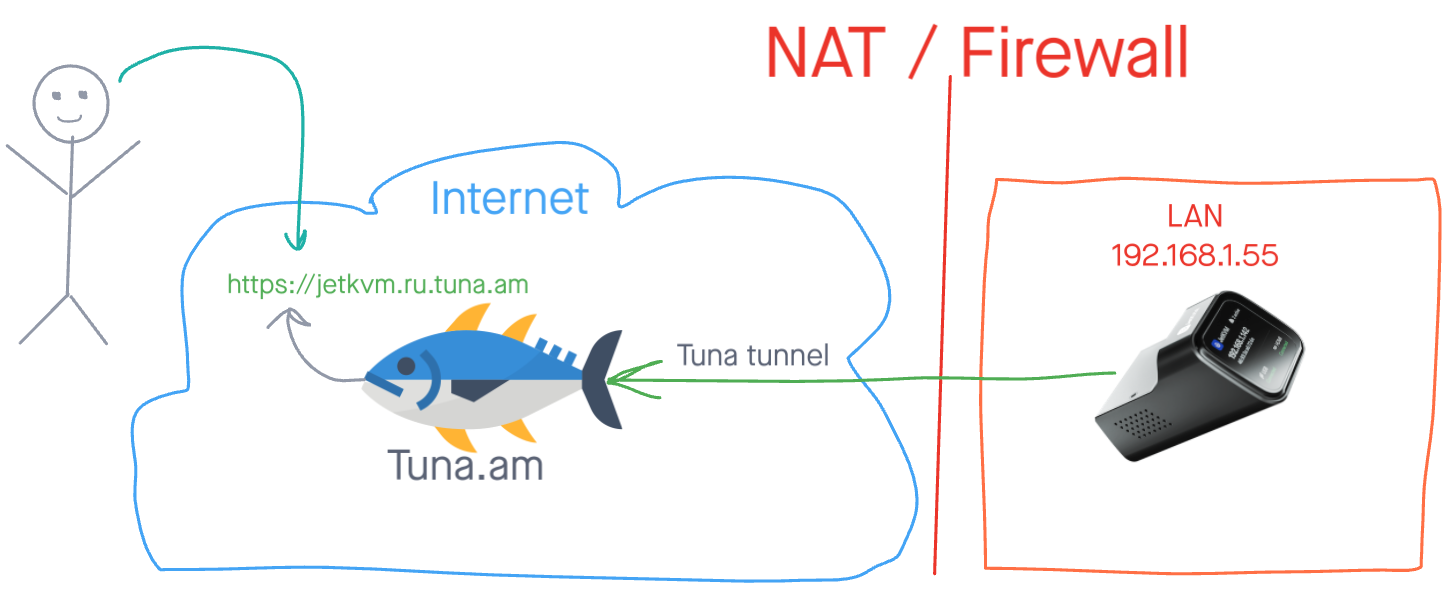
This guide is tested on JetKVM with system version v0.2.7 or newer. Earlier versions do not support /userdata/init.d/ — update JetKVM via the web interface (Settings → Device → Check for updates).
Preparation
In addition to installation, the setup guide is split into 2 types depending on whether you have a paid Tuna subscription.
What you will need
- JetKVM with system version v0.2.7 or newer
- Developer Mode enabled in the JetKVM web interface (Settings → Advanced → Developer Mode)
- An SSH key added via the JetKVM web interface
- An account on tuna.am (free or with a subscription)
- An auth token from the token page
JetKVM system specifics
JetKVM runs on a custom embedded Linux (Buildroot + Rockchip SDK). Important differences from a regular Linux system:
| Feature | Value |
|---|---|
| Shell | /bin/sh (BusyBox ash). bash is not available |
| SSH server | Dropbear (no scp, sftp, rsync) |
| Init system | BusyBox init + scripts in /userdata/init.d/ |
| Persistent partition | /userdata/ — preserved across OTA updates |
Storage layout:
| Path | Purpose | Preserved across OTA |
|---|---|---|
/ | Root FS | No |
/userdata/ | User data | Yes |
We will store tuna in /userdata/tuna/ so that the binary and configuration are preserved across updates.
Connecting via SSH
Enable Developer Mode in the JetKVM web interface and add a public RSA key (Settings → Advanced → Developer Mode). Then connect:
ssh root@<JetKVM-IP-address>
Or open the terminal in the web interface:
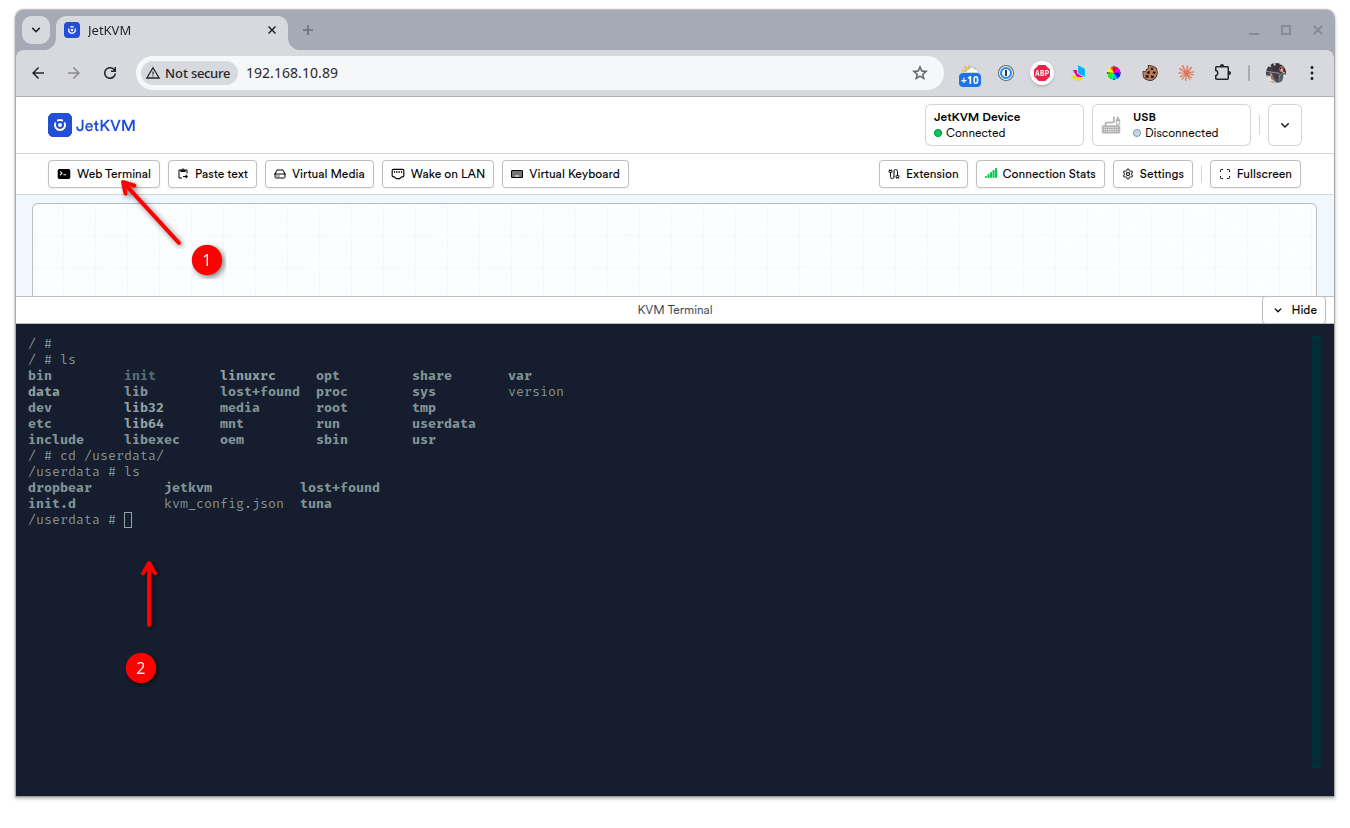
You can find the IP address on the JetKVM built-in screen or in your router's DHCP table.
Installing tuna on JetKVM
Connect to JetKVM via SSH and install the binary:
mkdir -p /userdata/tuna
INSECURE=true INSTALL_DIR=/userdata/tuna sh -c "$(wget -qO- http://releases.tuna.am/tuna/get.sh)"
INSECURE=true?JetKVM does not have root CA certificates, so wget cannot verify the server's SSL certificate. The INSECURE=true flag switches the script to download over HTTP. This is safe because the tuna binary can be verified by checksum after download.
The /userdata partition is preserved across OTA updates, so you will not need to reinstall tuna after firmware updates.
Save the auth token:
/userdata/tuna/tuna --config=/userdata/tuna/.tuna.yml config save-token <YOUR_TOKEN>
We recommend creating a dedicated token for the device.
JetKVM auto-start system
Unlike NanoKVM, where auto-start is configured via /etc/inittab with the respawn directive, JetKVM uses init scripts in the /userdata/init.d/ directory, which needs to be created.
mkdir -p /userdata/init.d
At boot, the JetKVM init system runs all scripts in /userdata/init.d/ whose names match the pattern S??* (for example, S99tuna-http). Scripts are invoked with the start argument, and with the stop argument when stopping.
Failing to follow these rules can cause the device to fail to boot:
- Use
#!/bin/sh— there is no/bin/bashon JetKVM. The#!/bin/bashshebang will cause an error and may block booting. - Do not use the
.shextension — files with the.shextension are included viasource(not invoked as a separate process). Anexitcommand in such a script will terminate the entire init process. - Do not block boot — all long-running processes must be started in the background with
&. If the script does not return control, boot will hang. - Handle the
startargument — the init system invokes the script asS99tuna-http start. Withoutcase "$1", the script may not run correctly.
Unlike NanoKVM (where inittab respawn automatically restarts a crashed process), on JetKVM /etc/inittab is overwritten during OTA updates. That's why we use a while true loop inside the init script to auto-restart on failure.
Always run the script manually (/userdata/init.d/S99tuna-http start) and make sure the prompt returns. If the console "hangs" after running it — the script will block boot on reboot.
Type 1. Free plan — HTTP tunnel
The free plan provides an HTTP tunnel with a dynamic address. This is enough to expose the JetKVM web interface to the internet and control your computer through a browser.
- The dynamic address changes every time the tunnel reconnects
- To keep the address, add your free permanent subdomain to the launch command:
--subdomain=<your-subdomain> - The current address is always available in the personal cabinet
Creating the init script
cat << 'INITEOF' > /userdata/init.d/S99tuna-http
#!/bin/sh

PIDFILE=/tmp/tuna-http.pid
LOGFILE=/tmp/tuna-http.log

wait_network() {
    i=0
    while ! ip route | grep -q default; do
        sleep 1
        i=$((i + 1))
        if [ "$i" -ge 60 ]; then
            echo "$(date): network timeout" >> "$LOGFILE"
            return 1
        fi
    done
    return 0
}

start() {
    echo "$(date): starting tuna-http" >> "$LOGFILE"
    (
        wait_network || exit 1
        while true; do
            /userdata/tuna/tuna \
                --config=/userdata/tuna/.tuna.yml \
                --log="$LOGFILE" \
                http \
                --inspect=false \
                --basic-auth=tuna:SecurePasswd \
                --https-redirect \
                80 >> "$LOGFILE" 2>&1
            echo "$(date): tuna-http exited, restarting in 5s" >> "$LOGFILE"
            sleep 5
        done
    ) &
    echo $! > "$PIDFILE"
}

stop() {
    if [ -f "$PIDFILE" ]; then
        kill "$(cat "$PIDFILE")" 2>/dev/null
        pkill -f "/userdata/tuna/tuna.*http" 2>/dev/null
        rm -f "$PIDFILE"
    fi
}

case "$1" in
    start) start ;;
    stop) stop ;;
    restart) stop; sleep 1; start ;;
    *) echo "Usage: $0 {start|stop|restart}" ;;
esac
INITEOF
chmod +x /userdata/init.d/S99tuna-http
Init script explanation
| Element | Description |
|---|---|
S99tuna-http | Name without .sh — init invokes the script with the start argument rather than including it via source |
wait_network() | Waits for a default route to appear (up to 60 seconds) |
( ... ) & | Subshell runs in the background — does not block boot |
while true | Auto-restarts tuna on failure (5 second pause) |
echo $! > "$PIDFILE" | Saves the subshell PID for proper stopping |
pkill -f | On stop, kills both the wrapper and the child tuna process |
tuna flag explanation
| Flag | Required | Description |
|---|---|---|
--inspect=false | No | Disables the traffic inspector (not needed for KVM) to save RAM |
--basic-auth=admin:YourPassword | No | Additional HTTP authentication (details) |
--https-redirect | No | Redirects HTTP to HTTPS |
80 | Yes | JetKVM web interface port |
You can also restrict access by IP subnets.
Verification
Run the script manually:
/userdata/init.d/S99tuna-http start
Make sure the prompt returns (the script did not block the console). Check that the process is running:
ps | grep tuna
The output should contain a line with /userdata/tuna/tuna ... http .... If there is no such process — see the Troubleshooting section.
In the logs, you will see your tunnel URL:
cat /tmp/tuna-http.log
The current address is also available in the personal cabinet.
Type 2. Subscription — SSH and HTTP tunnels
With a subscription you get:
- Fixed subdomain for the HTTP tunnel — the address does not change
- SSH tunnel — direct access to the JetKVM console from anywhere in the world
HTTP tunnel with a fixed address
cat << 'INITEOF' > /userdata/init.d/S99tuna-http
#!/bin/sh

PIDFILE=/tmp/tuna-http.pid
LOGFILE=/tmp/tuna-http.log

wait_network() {
    i=0
    while ! ip route | grep -q default; do
        sleep 1
        i=$((i + 1))
        if [ "$i" -ge 60 ]; then
            echo "$(date): network timeout" >> "$LOGFILE"
            return 1
        fi
    done
    return 0
}

start() {
    echo "$(date): starting tuna-http" >> "$LOGFILE"
    (
        wait_network || exit 1
        while true; do
            /userdata/tuna/tuna \
                --config=/userdata/tuna/.tuna.yml \
                --log="$LOGFILE" \
                http \
                --subdomain=jetkvm \
                --inspect=false \
                --basic-auth=admin:YourPassword \
                --https-redirect \
                80 >> "$LOGFILE" 2>&1
            echo "$(date): tuna-http exited, restarting in 5s" >> "$LOGFILE"
            sleep 5
        done
    ) &
    echo $! > "$PIDFILE"
}

stop() {
    if [ -f "$PIDFILE" ]; then
        kill "$(cat "$PIDFILE")" 2>/dev/null
        pkill -f "/userdata/tuna/tuna.*http" 2>/dev/null
        rm -f "$PIDFILE"
    fi
}

case "$1" in
    start) start ;;
    stop) stop ;;
    restart) stop; sleep 1; start ;;
    *) echo "Usage: $0 {start|stop|restart}" ;;
esac
INITEOF
chmod +x /userdata/init.d/S99tuna-http
The difference from the free version is the --subdomain=jetkvm flag, which reserves a permanent address for you. After restarting the tunnel, the URL will remain the same.
The example subdomain may already be taken. Reserve your subdomain in advance in the personal cabinet, then use it in the --subdomain=your-subdomain flag.
HTTP tunnel flag explanation
| Flag | Required | Description |
|---|---|---|
--subdomain=jetkvm | No | Reserves a permanent tunnel address (subscription only) |
--inspect=false | No | Disables the traffic inspector (not needed for KVM) to save RAM |
--basic-auth=admin:YourPassword | No | Additional HTTP authentication (details) |
--https-redirect | No | Redirects HTTP to HTTPS |
80 | Yes | JetKVM web interface port |
You can also restrict access by IP subnets.
SSH tunnel
The SSH tunnel allows you to connect to the JetKVM console over the internet. This is convenient for administration, firmware updates, and diagnostics.
cat << 'INITEOF' > /userdata/init.d/S98tuna-ssh
#!/bin/sh

PIDFILE=/tmp/tuna-ssh.pid
LOGFILE=/tmp/tuna-ssh.log

wait_network() {
    i=0
    while ! ip route | grep -q default; do
        sleep 1
        i=$((i + 1))
        if [ "$i" -ge 60 ]; then
            echo "$(date): network timeout" >> "$LOGFILE"
            return 1
        fi
    done
    return 0
}

start() {
    echo "$(date): starting tuna-ssh" >> "$LOGFILE"
    (
        wait_network || exit 1
        while true; do
            /userdata/tuna/tuna \
                --config=/userdata/tuna/.tuna.yml \
                --log="$LOGFILE" \
                ssh \
                --port=jetkvm-ssh \
                --record-session=false \
                --password-auth=false >> "$LOGFILE" 2>&1
            echo "$(date): tuna-ssh exited, restarting in 5s" >> "$LOGFILE"
            sleep 5
        done
    ) &
    echo $! > "$PIDFILE"
}

stop() {
    if [ -f "$PIDFILE" ]; then
        kill "$(cat "$PIDFILE")" 2>/dev/null
        pkill -f "/userdata/tuna/tuna.*ssh" 2>/dev/null
        rm -f "$PIDFILE"
    fi
}

case "$1" in
    start) start ;;
    stop) stop ;;
    restart) stop; sleep 1; start ;;
    *) echo "Usage: $0 {start|stop|restart}" ;;
esac
INITEOF
chmod +x /userdata/init.d/S98tuna-ssh
SSH tunnel flag explanation
| Flag | Required | Description |
|---|---|---|
--port=jetkvm-ssh | No | Reserves the SSH tunnel port. Without this flag, the port is assigned randomly on each startup. The port alias must be reserved in advance before startup. |
--record-session=false | No | Disables recording SSH sessions to disk. Recommended on embedded devices with limited storage to save space. |
--password-auth=false | No | Disallows password authentication — access via SSH keys only (details) |
You can also set a static login and password or restrict access by IP subnets.
Verifying tunnels
Run both scripts manually:
/userdata/init.d/S99tuna-http start
/userdata/init.d/S98tuna-ssh start
Make sure both processes are running:
ps | grep tuna
The output should contain two lines — one with http and one with ssh. If a process is missing — see the Troubleshooting section.
View the logs:
cat /tmp/tuna-http.log
cat /tmp/tuna-ssh.log
The HTTP tunnel logs will contain the URL, and the SSH tunnel logs will contain connection instructions with the address and port.
Managing tunnels
Auto-restart on failure is provided by the while true loop inside the init script. Use the following commands to manage the tunnels.
Check status
ps | grep tuna
Stop a tunnel
# Stop the HTTP tunnel
/userdata/init.d/S99tuna-http stop

# Stop the SSH tunnel
/userdata/init.d/S98tuna-ssh stop
Start a tunnel
# Start the HTTP tunnel
/userdata/init.d/S99tuna-http start

# Start the SSH tunnel
/userdata/init.d/S98tuna-ssh start
Restart a tunnel
# Restart the HTTP tunnel
/userdata/init.d/S99tuna-http restart

# Restart the SSH tunnel
/userdata/init.d/S98tuna-ssh restart
Fully disabling auto-start
To prevent a tunnel from starting at boot, rename the script removing the S prefix:
# Disable HTTP tunnel auto-start
mv /userdata/init.d/S99tuna-http /userdata/init.d/disabled-tuna-http

# Re-enable it
mv /userdata/init.d/disabled-tuna-http /userdata/init.d/S99tuna-http
Recovery after an OTA update
The binary, configuration, and init scripts are stored in /userdata/, which is preserved across OTA updates. After a firmware update via the JetKVM web interface, the tunnels will keep working without any additional steps.
Unlike NanoKVM, on JetKVM you do not need to restore /etc/inittab after an update — auto-start via /userdata/init.d/ fully survives OTA.
After a full re-flash (when /userdata was cleared), you will need to install the binary, save the token, and create the init scripts again.
Additional security settings
Why you need --basic-auth
JetKVM has its own authentication in the web interface. However, given the history of vulnerabilities in IoT devices, we strongly recommend adding an extra layer of protection. When exposing access through the internet, it's better to be safe — the --basic-auth flag adds standard HTTP authentication (username and password in the browser) before the request even reaches JetKVM.
--basic-auth=mylogin:MyStr0ngP@ss
Set your own login and password. Do not use the values from the examples.
SSH tunnel authentication
Option 1. SSH keys (recommended)
The --password-auth=false flag disables password login. To connect, you will need to add a public SSH key in advance in the personal cabinet.
Detailed guide: SSH keys setup
Tunnel nodes have public addresses. Attackers can scan ports and start brute-forcing passwords. For long-lived SSH tunnels, we strongly recommend disabling password authentication.
Option 2. Static login and password
If SSH keys are not suitable, you can set fixed credentials:
--auth=user:pass
Replace user and pass with your own values.
Restricting access by IP subnets
For HTTP and SSH tunnels, you can restrict access by IP addresses.
Allow access only from specific subnets:
--cidr-allow="203.0.113.0/24"
Deny access from specific subnets:
--cidr-deny="198.51.100.0/24"
You can combine — allow a subnet but exclude individual addresses:
--cidr-allow="10.0.0.0/24" --cidr-deny="10.0.0.33/32"
Use IP filtering carefully. If you make a mistake with the subnet or your IP address changes — you will lose remote access to JetKVM. Make sure you have an alternative way to manage the device (for example, local access).
Troubleshooting
Device fails to boot after adding an init script
If JetKVM stopped booting after adding a script to /userdata/init.d/, the most common causes are:
#!/bin/bashshebang — bash is not available on JetKVM- Script blocks boot — the process is not started in the background (
&) .shextension — the script was included viasource, which broke the init process- Syntax error — interrupts init execution
Recovery methods:
- UART serial console — if you have access to the JetKVM UART port, connect via serial console (115200 baud) and remove or rename the problematic script
- Factory reset — press and hold the reset button on JetKVM (note: this may clear
/userdata/)
tuna process does not start
Check that the process is in the list:
ps | grep tuna
If the output has no lines with /userdata/tuna/tuna, check:
- The script exists and is executable:
ls -la /userdata/init.d/S9*tuna*
- The script runs without errors:
/userdata/init.d/S99tuna-http start
- The tuna binary works:
/userdata/tuna/tuna version
Viewing logs
Tunnel logs are written to /tmp/ and are available until the device reboots:
# HTTP tunnel logs
cat /tmp/tuna-http.log

# SSH tunnel logs
cat /tmp/tuna-ssh.log
To watch logs in real time:
tail -f /tmp/tuna-http.log
Common errors in logs
| Error | Cause | Solution |
|---|---|---|
token is invalid | Invalid or expired token | Repeat config save-token with a fresh token from the page |
Domain already reserved | Subdomain is taken by another user | Choose another name via --subdomain= |
port alias not found | Port alias is not reserved | Reserve the alias in the personal cabinet |
connection refused | No internet access | Check the network: ping -c 3 8.8.8.8 |
exec format error | Wrong binary architecture | Make sure you are using tuna_linux_arm (ARMv7) |
No internet access
Check that JetKVM has a network connection:
# Check for an IP address
ip addr

# Check the default route
ip route

# Check internet access
ping -c 3 8.8.8.8
Logs disappeared after a reboot
Logs are stored in /tmp/, which is cleared on reboot. This is normal behavior. If you need to keep logs across reboots, change the path in the init scripts:
LOGFILE=/userdata/tuna/tuna-http.log
Frequent log writes may shorten the storage's lifespan. Use this only for temporary debugging.
Tunnel was working and stopped
- Check the logs for errors
- Make sure the token is still valid in the personal cabinet
- Check that the script in
/userdata/init.d/is in place and executable:
ls -la /userdata/init.d/S9*tuna*
Links
- JetKVM — official site
- JetKVM — GitHub
- JetKVM — documentation
- HTTP tunnel — all flags
- SSH tunnel — all flags
- SSH keys setup
- Running tuna as a service
Availability monitoring
In addition to tunnels for remote access, you can set up availability monitoring for JetKVM. Heartbeat monitoring will send you notifications if the device loses internet connectivity or stops responding.
Full guide: JetKVM availability monitoring